What Is Wrong With The Shot Put Release In This Photo?
The Challenge
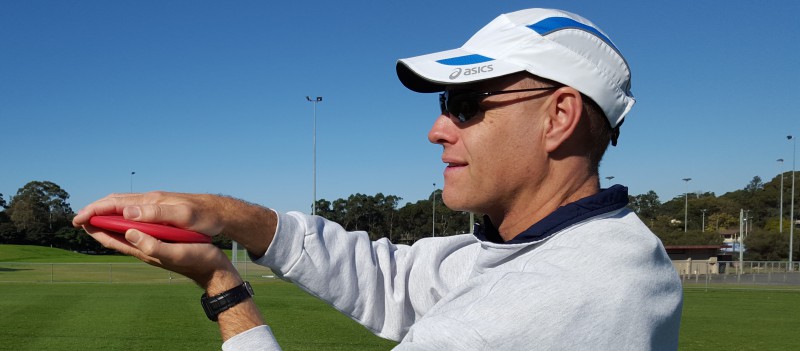
Look closely at this photo of a shot putter releasing the implement. Can you see a problem?

Photo credit Wavebreakmedia from Getty Images Pro via Canva.
Can you see a basic shot put release error?
It stands out clearly to me, but it’s a point of technique about which many people are unaware. Many people believe that this is how it is supposed to be done.
The athlete appears to be in a tall position, the throwing arm is fully extended, and the non-throwing arm has been pulled in to help effect a block. This is all good stuff.
But look at the position of the throwing hand. This is where the problem lies.
The Error
The fingers and thumb are pointed upwards.

Did you even know that this was a problem?
It is quite a significant error and one that is extremely common with novices.
A “fingers up” release, where the athlete finishes in a position as if they are making a “stop” gesture, will result in a lack of propulsion applied to the shot.
Let me explain further.
How To Release The Shot
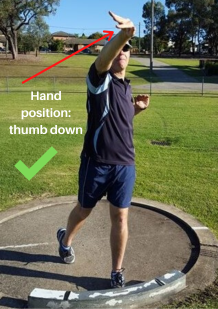
The hand should finish in a “thumb-down” position with the wrist fully extended and the fingers pointing out to the side.
Why? Let’s do a comparison.
A Comparison

The Fingers, Hand & Wrist
The image on the right demonstrates a “snap” of the wrist to “flick” the shot off the fingers as it leaves the hand.
In the photo on the left, the wrist has been left in a neutral position as the shot is released. The athlete has simply “let go” of the shot, providing no additional propulsion off the fingers.
The Elbow
In the photo on the right, the finishing position of the hand (thumb-down) indicates that the elbow has been kept up behind the shot, helping to drive it forward. If the thumb is down the elbow will be up.
Thumb down, elbow up.
In the photo on the left the final hand position indicates that either:
- The throwing arm elbow started low/tucked in against the thrower’s body or;
- The throwing arm elbow was dropped during the putting action.
A low or “dropped” elbow places the athlete’s arm in a very poor position to impart a forward force on the shot.
Correction
Some coaching cues and/or remedial drills may assist:
1. Elbow Up, Thumb Down
The cue of “elbow up, thumb down” is a very simple directive that may help. When the thumb is down, the elbow will be up and when the elbow is up, the thumb will be down.
2. Side 5
You are probably familiar with a “high 5”. Teach kids to use “side 5” action to keep the thumb pointing down.
3. Elbow is the Engine
The elbow needs to stay behind the shot. Think of the elbow as the shot’s engine, pushing it along. Visualise a boat being propelled along by an outboard motor. The elbow is the motor that propels the forearm, hand and the shot forward.
4. Shot Put Slams
The shot put slam drill is wonderful for helping kids learn how to drive the shot away from the neck, keep their elbow behind the shot and propel it off the fingers.

Over To You
Look for kids who finish in a “fingers-up” position when releasing a shot. If you find them, try some of the corrective actions suggested above. I would love to hear how it goes. Let me know by leaving a comment/reply or by using the contact details below.
Further reading
E- Book:
How To Teach Shot Put To Young Athletes E-Book (plus bonus cheat sheet)
Articles:
The “Shot Put Slam” Drill for Young Athletes
An Elbow Cue That Will Make You A Better Shot Put Coach
10 Biggest Mistakes Young Athletes Make in the Shot Put
If this post helped you please take a moment to help others by sharing it on social media. If you want to learn more I encourage you to leave questions and comments or contact me directly.
 Darren Wensor is a sports development professional, coach educator, specialist coach of young athletes and founder of the blog coachingyoungathletes.com. Learn more about him here and connect with him on Twitter, Facebook, Linkedin, Anchor or via email.
