Getting to Grips with Javelin
Let’s do a quick exploration of the fundamentals of javelin throwing. We’ll use some helpful analogies to assist our understanding along the way.
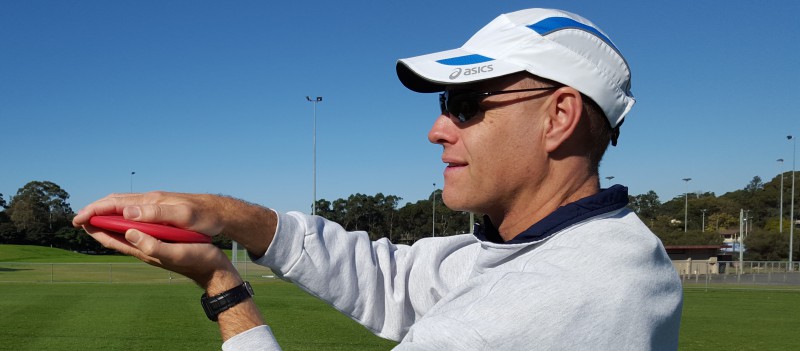
Javelin Grip
To begin, let’s discuss the javelin grip. The most common grip is known as the “one-finger” javelin grip. This grip involves placing the index finger (i.e. one finger) and thumb above the binding on the javelin, which rests firmly across the palm of the hand. The positioning of the index finger and thumb just behind the binding lets an athlete pull on the back of the binding during the throw and impart spin on the implement. Unlike shot put, where the shot should not rest on the palm, the javelin grip requires the javelin to sit diagonally across the palm. This grip provides stability to the implement and helps the athlete control the javelin. While there are three main javelin grips, the “one-finger” grip is the most prevalent.
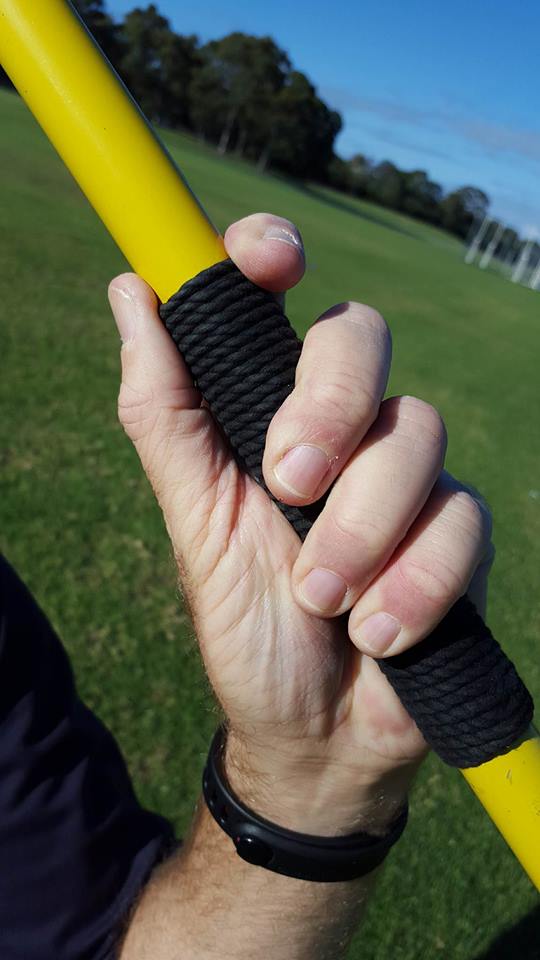
Try this: Pick up a pen or pencil and hold it diagonally across your palm. Can you feel how much steadier it becomes when supported by your thumb and index finger?
Throwing Technique
When it comes to the actual throw, there are a few key points to consider:
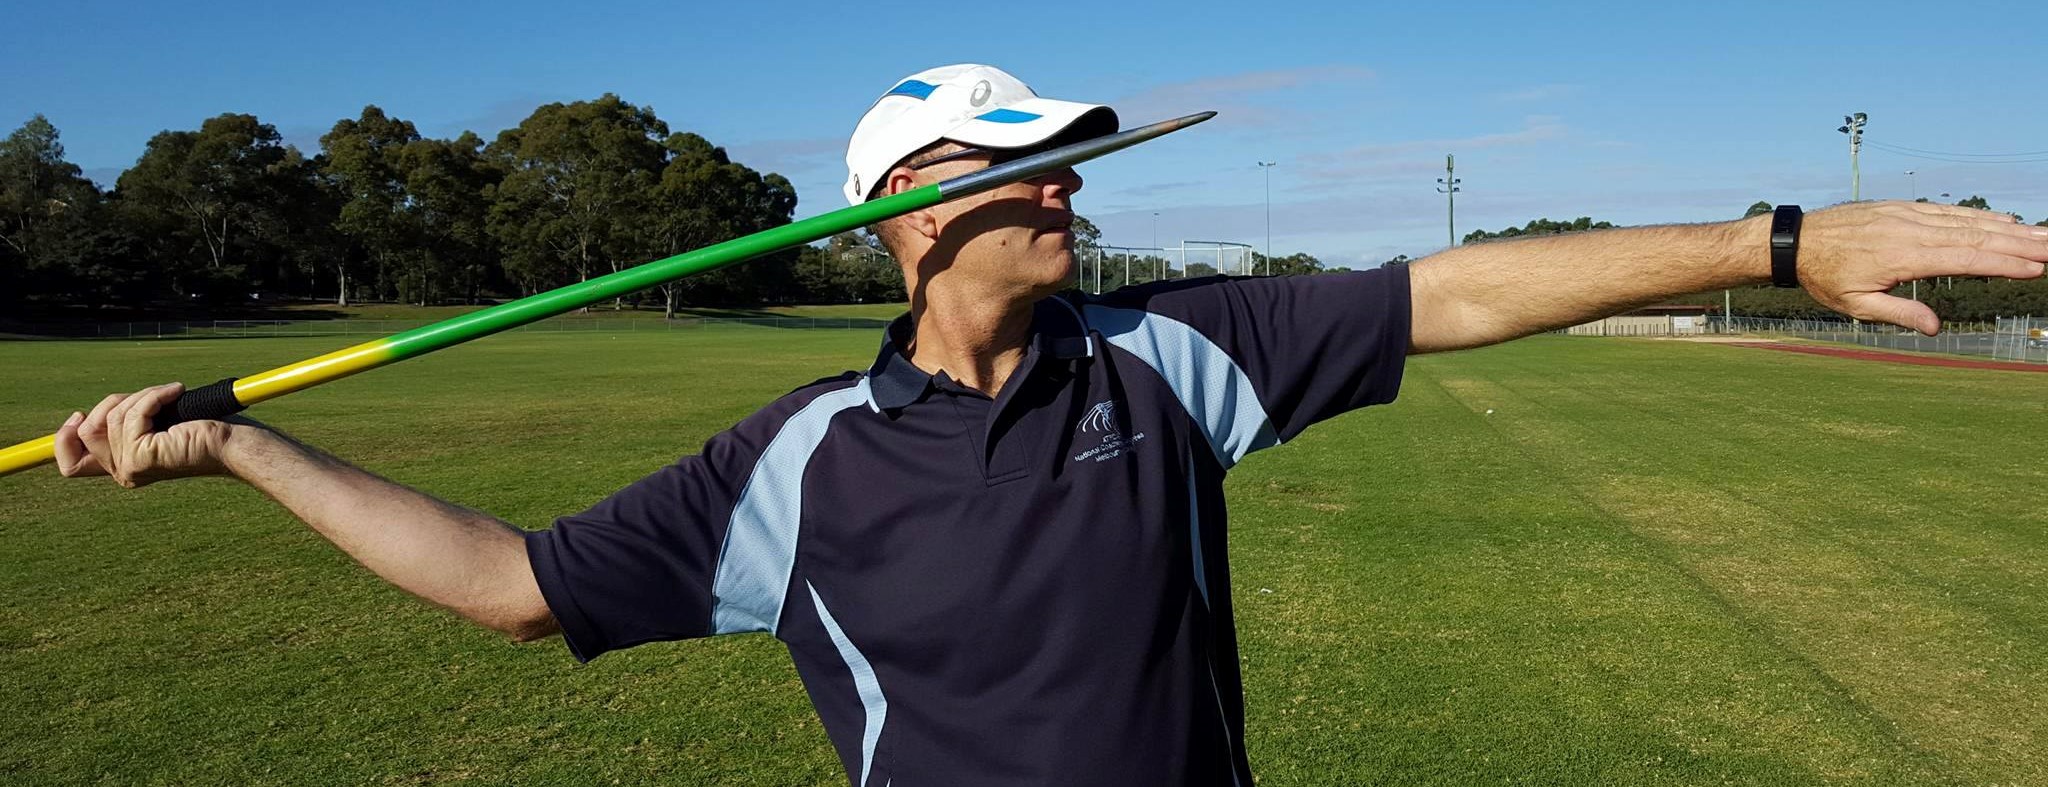
1. Javelin Alignment
Firstly, just like an aircraft on a runway, the nose of the javelin should always be pointed in the direction of the throw or “take-off”. Therefore, the javelin’s nose should align with the intended direction throughout the run-up and release. (So the pilots in the cockpit of the aircraft can see where they are going!). Ideally, the javelin should be positioned close to the temple or eye when the arm and implement are withdrawn in preparation to throw.
Task: When you next watch young athletes pull the javelin back, does it stay in line with the direction of the throw or start to drift to the side?
2. Arm Action
Another important aspect of the javelin throw is the throwing motion itself. It is an overarm throwing action, resembling a tennis serve. Emphasise to young athletes that the javelin must not be slung or released below the shoulder line. Any throw that falls below this line should be considered a foul throw. By drawing parallels to familiar overarm actions, such as a tennis serve, athletes can better grasp the correct technique.
Task: The next time you watch the athletes throw, notice whether the athletes’ throws look more like a tennis serve or a side-arm sling.
Understanding the Rules
To prevent foul throws, athletes need to be aware of certain rules. Some of the key rules are:
- The javelin must be held at the grip.
- The javelin must not be slung or hurled.
- Stepping over the foul line constitutes a foul.
- The javelin must land entirely within the sector lines for the throw to be valid.
- It is important to note that the metal head of the javelin must strike the ground first, and it does not necessarily have to stick into the ground. If the javelin lands tail-first or lands flat, it will be deemed a foul throw.
- Athletes must exit the runway from behind the foul line.

Reflection: Which javelin rule do you think is the most misunderstood?
Measuring Throws
Measuring the distance of javelin throws requires attention to detail.
1. Measure to the Javelin’s Mark
Similar to shot put and discus, you start by extending the zero end of the tape measure to where the metal head of the javelin first hits the ground. If it leaves a mark, measuring becomes relatively straightforward. However, if there is no visible mark, an estimate will have to be made based on your observation.
2. Pull the Tape Back Through the Centre of the Circle
Here’s where it gets a bit trickier: imagine the throwing area as a big circle, with the foul line the front edge of the circle. You need to pull the tape measure back through the circle’s middle, which is located 8 metres behind the foul line. It is crucial to have someone assist you in this process.
3. Read the Measurement
The measurement is read from the inside edge of the arc (foul line). This measurement represents the distance thrown by the athlete.

Try this: Next time you measure, enlist a helper to keep the tape aligned through the circle’s centre.
Safety Considerations
Safety should always be a top priority when coaching javelin. Here are a few essential safety considerations to keep in mind:
1. Establish a safe throwing area
Ensure that the throwing area is clear of any obstructions, including other athletes, equipment, and spectators. Mark the boundaries clearly to prevent anyone from entering the danger zone during a throw.
2. Proper runway usage
Teach athletes to wait for their turn and not to step onto the runway until it is their time to throw. This helps avoid collisions and distractions that could compromise safety.
3. Respect the release zone
Emphasise the importance of athletes staying behind the release zone when another athlete is throwing. This ensures a safe distance is maintained and reduces the risk of accidents.
4. Supervision and guidance
Always have a qualified coach or knowledgeable adult present to supervise javelin training and competition. Their role is to provide guidance, technique tips, and intervene if any safety concerns arise. Young athletes should not use javelins unsupervised.
5. Equipment inspection
Regularly inspect javelins for any signs of damage or wear. Damaged javelins should never be used. Ensure that athletes are using appropriate javelins suitable for their age group and skill level.
6. Javelin management
Instruct athletes to always carry a javelin in a point-down vertical position.
7. Javelin collection
Never run towards a javelin that is protruding from the ground. Beware of others around you when removing a javelin that is stuck in the ground. Move it to the vertical carry position described above as soon as possible.

Remember, safety should never be compromised, and it is crucial to educate both athletes and their parents or guardians about the importance of adhering to safety guidelines.
Reminder: Always brief and remind athletes and any helpers about javelin safety.
Conclusion
Learning the art of javelin throwing requires a combination of sound technique and an understanding of the event’s rules. By making use of analogies, athletes may visualise and grasp the concepts more effectively. Remember to emphasise the correct grip, the alignment of the javelin’s nose, and the overarm throwing motion. Educate athletes about foul throws and the importance of safety at all times.
Further Reading
Javelin E-Book:
How To Introduce Javelin to Young Athletes (plus bonus cheat sheet) by Coaching Young Athletes
Javelin Teaching Article:
10 Quick and Easy Teaching Tips for Javelin
Javelin Technique Articles:
How to Control the Point of the Javelin
How to Teach the Over-the-Shoulder Action in Javelin Throwing
A Fun Analogy for Teaching Kids the Overarm Javelin Throwing Action
Javelin Safety Article:
Javelin Safety for Athletes and Coaches
If this post helped you please take a moment to help others by sharing it on social media. If you want to learn more I encourage you to leave questions and comments or contact me directly.

Darren Wensor is a sports development professional, coach educator, specialist coach of young athletes, and founder of the blog coachingyoungathletes.com. Learn more about him here and connect with him on Twitter, Facebook, Linkedin, or via email. Check out Coaching Young Athletes on YouTube, the Coaching Young Athletes podcast, and the Coaching Young Athletes E-Book Series.
Click here to subscribe for free to the Coaching Young Athletes email list and receive a complimentary mini e-book!
Love what you have read? Behind every article on Coaching Young Athletes lies hours of dedication and passion. Click below to make a one-off donation and help keep the blog going strong. Your generosity makes a difference, no matter the size. Thank you for your support!
Choose an amount
Your contribution is appreciated.
Donate