How to Simplify a Child’s Shot Put or Discus Stance
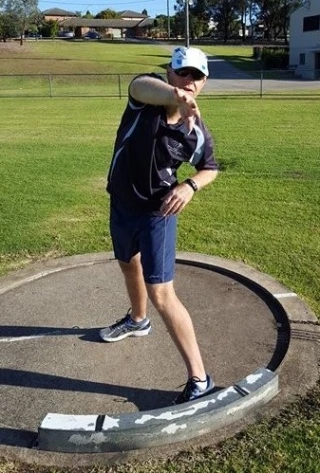
Kids are traditionally taught a side-on starting position for a standing shot put or discus throw. They are told to place their feet parallel and point their toes 90 degrees away from the throwing direction. Their lead foot is as near to the front of the circle as possible. In the shot put, this foot is often slammed right up against the stop board and locked into place.

There are two main problems with this stance:
1. Restriction of Movement
We should throw using head to toe. A side-on starting position can restrict a beginner’s movement. The stance makes it very difficult for them to pivot to the front:
- In the shot put, the foot will be stuck against the stop board and locked into place.
- In the discus, the foot is so close to the front of the circle that the child is fearful of moving it and causing a foot foul.
In both cases, a beginner will likely attempt to throw while remaining side-on. This can be awkward and restrictive. You will often see an “across-the-body” arm action lacking any contribution from the legs.
A misdirected throw may also occur, with the shot or discus being released too early. The implement will commonly follow the direction of the feet and hips.
2. Complexity of Movement
Regardless of how close to the edge of the circle a young athlete is, a side-on starting stance also complicates a beginner’s throwing action.
Ideally, a young athlete will finish their throw with their eyes, chest, hips, and feet pointing in the throwing direction. When they start side-on, it can be complicated to get to a front-on position. Not only will it present coordination and balance challenges, but the child’s working memory has a limited capacity. This will restrict the number of things the child can focus on at any one time. The early stages of shot put or discus development involve learning to control an unfamiliar, heavy implement. Besides this, shot put requires a specific shot placement and arm action to stay within the rules. The discus needs a certain grip and release to be effective. Adding rotation into this mix is all too much for the young beginner.
There is a way that we can reduce the strain on working memory and effectively teach some important positions.
Let’s take one step back.
The Alternative: A Forward-Facing Stance
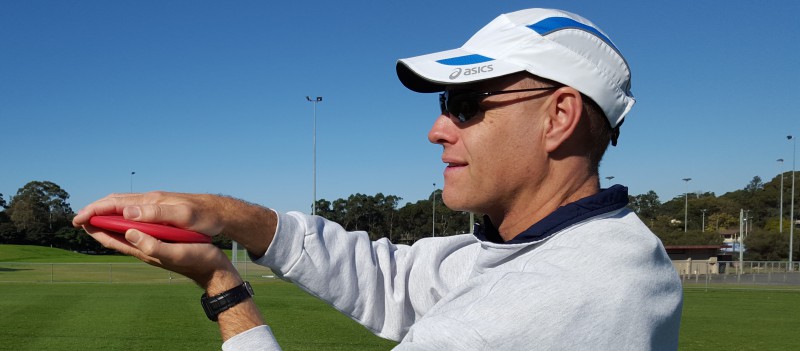
We want kids to deliver a shot or discus with the feet, hips, torso, and eyes to the front. I suggest starting them in this position.
Initially take the rotation out so they can concentrate on learning a legal shot putting arm action, or developing an effective discus release.

With the feet in this position, the belly button and non-throwing hand will be pointing straight down the middle of the landing sector. For shot put, the elbow of the throwing arm will be up and pointing out to the side. Some kids will naturally make a slight turn of their torso away from the throwing direction before commencing the putting action. This is fine as long as the shot stays near the neck and jaw.
The Benefits of Starting Forward-Facing
- The young athlete is automatically put into an effective finishing stance without having to think about how to get there.
- The feet are not locked 90 degrees from the throwing direction.
- The delivery will be achieved from a more balanced, stable position.
- In the shot put, the focus can now be on the grip and arm action.
- In the discus, the child’s attention can be on the discus grip and release.*
* With beginners, I encourage an underarm delivery. This is where the discus is held vertically, swung past the hip in a vertical plane, and spun over the index finger out of the front of the hand.
Progression From The Forward-Facing Stance
Once a child is comfortable with this forward-facing starting position and can control the implement, they can progress. I suggest that this is best done by gradually turning their preliminary stance further away from the throwing direction. By this stage, the kids will already be familiar with the implement grip and release, and the front-on finishing position. They can now be incrementally taught how to rotate to impart more momentum to the implement. In the discus, this will also involve graduating the kids from an underarm discus toss to a side-arm slinging action. Do this by encouraging the kids to gradually lift their throwing arm higher and closer to the horizontal plane.
Summary
Ultimately, we want a young athlete to throw using as much of their body as possible. Part of this will require them to begin turned away from the throwing direction and rotate into their delivery. But we don’t need to start beginners there. I suggest going one step further back from the traditional side-on starting stance and begin with their feet, hips, belly button, chest, and eyes facing forward.
Further Reading
E-Books by Coaching Young Athletes:
How To Teach Shot Put To Young Athletes E-Book (plus bonus cheat sheet)
How To Teach Discus To Young Athletes E-Book (plus bonus cheat sheet)
Article:
10 Quick and Easy Teaching Tips for Shot Put
If this post helped you please take a moment to help others by sharing it on social media. If you want to learn more I encourage you to leave questions and comments or contact me directly.

Darren Wensor is a sports development professional, coach educator, specialist coach of young athletes, and founder of the blog coachingyoungathletes.com. Learn more about him here and connect with him on Twitter, Facebook, Linkedin, or via email. Check out Coaching Young Athletes on YouTube, the Coaching Young Athletes podcast, and the Coaching Young Athletes E-Book Series.
